今回は、Juliaの機械学習フレームワークFlux.jlでSinGAN(一部)を実装して、1枚のアルバムジャケット画像からアニメーションを作成します。結構長いです。
きっかけは、この紹介記事です。
【SinGAN】たった1枚の画像から多様な画像生成タスクが可能に
実はDCGANをFlux.jlで実装したあと、MNISTの画像では味気ないので自分でデータセットを作成して画像の自動生成を試みていましたが、 ダブりなく大量の画像を収集してデータセットを整備するのは骨が折れ、今一つの結果しか出なかったのでお蔵入りにしていました。
しかしながら、SinGAN記事に関する読んでみると驚いたことにSinGANではたった1枚の画像から超解像化やアニメーション生成が行え、 ハイスペックのGPUを回さなくても結果が得られるということで実装に挑戦したくなりました。
一部実装を簡略化したので、論文の著者による実装を完全に再現できたわけではないのでご了承ください。 間違っている点・改善すべき点はご指摘頂けると幸いです。
環境
実行環境はJulia v1.3.0 + Flux.jl v0.10.0 で、GCPのGPU環境(K80)です。
前回と同様、Dockerによる環境構築ですが、JuliaのパッケージもDockerfileに含めてしまっていた前回と違い、 今回はDockerファイルはcudaのベースイメージ+Juliaのシンプルな構成として、Juliaのパッケージ管理はJuliaのプロジェクト機能を用いました。
参考にしたのは主に下記のページです。
Julia でのパッケージの作り方
Julia v1.0 でユニットテスト
SinGANのモデルの概略
理論的な部分の詳細は、論文 SinGAN: Learning a Generative Model from a Single Natural Image や 解説記事 に詳しいのでそちらを見ていただきたいのですが、モデルの概要を簡単に説明しておきます。
論文とは別に公開されている Supplementary Material はハイパーパラメーターや画像のパディング、アニメーションのノイズマップの作り方などが掲載されていて参考になります。
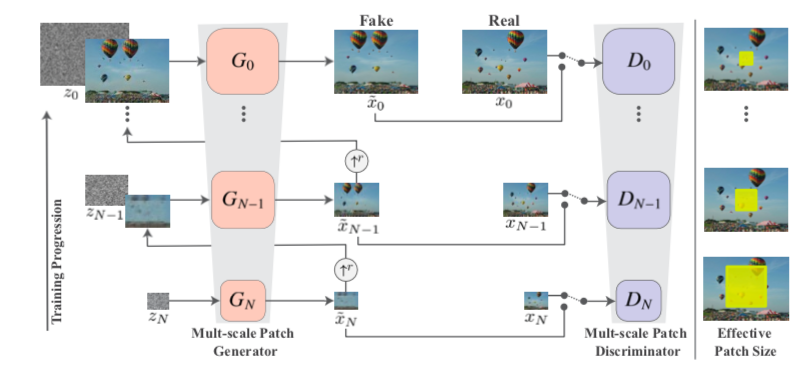
SinGAN’s multi-scale pipeline, retrieved from SinGAN: Learning a Generative Model from a Single Natural Image
SinGANの学習は、ピラミッド型の構造になっていて、下のステージから順々に学習を行います。 最初は、小さい画像サイズで全体の構造を学習し、ステージを上がっていくごとに画像サイズを拡大していき、微細な構造を学習します。 各ステージでは通常のGANのようにGeneratorとDiscriminatorを並行して学習させていきます。
GeneratorやDiscriminatorのネットワークは、特段難しい構成をしているわけではなく、
Conv(3x3)-BatchNorm-LeakyLeRU(0.2) を5層重ねて最後の活性化関数を Generator だったら tanh,
Discriminator だったら identity に変えたConvolutional netがベースとなります。
Discriminator はこれで完成で、Generator はもう一手間必要です。
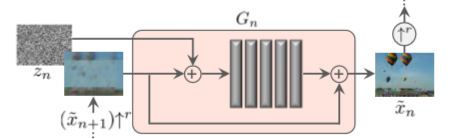
Single Scale Generation, retrieved from SinGAN: Learning a Generative Model from a Single Natural Image
Generatorの場合、入力には下層のステップで生成された画像+ノイズを与え、 Convolutional net で生成された結果にもう一度下層の生成画像を加えて出力とします。
論文では Generator \( G_n \) は \(z_n \) をノイズ、\(\tilde{x}_n\) を第 \(n\) 段階の出力画像, \( \uparrow^r\) をスケール \(r\) 倍の画像拡大とした時に、
$$ \begin{aligned} \tilde{x}_N &= G_N(z_N), \\ \tilde{x}_n &= G_n(z_n, (\tilde{x}_{n+1})\uparrow^r), n < N \end{aligned} $$ で、Fully convolutional net を \(\psi\) とした時に、
$$ \begin{aligned} G(x, z) = (x)\uparrow^r + \psi(z + (x)\uparrow^r) \end{aligned} $$
と言っています。実際は一段階前の画像に0パディングを行う(こともある)のでもう少し複雑になりますがあとで説明します。
損失関数ですが、各ステージで $$ \begin{aligned} \min_{G_n} \min_{D_n} ( \mathcal{L}{\text{adv}}(G_n, D_n) + \alpha \mathcal{L}{\text{rec}}(G_n) ) \end{aligned} $$ を考えるのですが、\(\mathcal{L}{\text{adv}}\) が Adversarial loss と呼ばれている通常の GAN の損失関数で、 計算するときは全てのステージでノイズを加えながら生成します。 \(\mathcal{L}{\text{rec}}\) は Reconstruction loss で、最初以外は全てゼロとなる特定のノイズ $$ \begin{aligned} z^{\text{rec}} = \{z_N^{\text{rec}}, z_{N-1}^{\text{rec}}, \ldots, z_0^{\text{rec}}\} = \{z^, 0, \ldots, 0 \} \end{aligned} $$ を一つ学習を通して固定し、縮小した元画像との二乗誤差 $$ \begin{aligned} \mathcal{L}_{\text{rec}, N} &= || G_N(z^) - x_N ||^2, \\ \mathcal{L}{\text{rec}, n} &= || G_n(0, (\tilde{x}{n+1}^{\text{rec}})\uparrow^r) - x_n ||^2, n<N \end{aligned} $$ を損失関数とするものです。
読んでいて一つ疑問に思ったのが出力データの値域です。
モデルでは、画像データを各数値が \( [-1,1] \) の範囲に収まる Array として表現しているのですが、
Convolutional Netで tanh を適用した段階では \( [-1,1] \) の範囲に収まるものの、
そのあと元の画像を足したらはみ出ることはあり得ます。
ロス関数による制約条件があるため大丈夫なのかもしれませんが……
実装開始
公式実装の tamarott/SinGAN をベースに、他の実装 FriedRonaldo/SinGAN も時たま参考にしながらやっていきます。
全部説明するのは大変なので、ポイントに絞って説明します。パッケージは先に色々インポートしておきます。
using Adapt
using BSON: @load, @save
using CuArrays
using Flux
using Flux: mse, pullback, glorot_normal
using Flux.Optimise: update!
using JSON
using OrderedCollections
using Random
using Statistics
配列の0、乱数埋め
役立つ関数をいくつか定義しておきます。
Convolutional Layerに対するFlux.jlの入力データは WHCN の順の array であり、
今回はカラー画像を使うのでチャンネル数は3(アルファチャンネルがないものを今回は使います), バッチサイズは1なので、画像サイズから array のサイズを計算する関数 expand_dim を下のように定義します。
あとは与えた配列と同じ型 (CPU 環境だったら Array, GPU 環境だと CuArray) で0や乱数で埋めた配列が欲しくなることがあるので、そのための関数も用意します。
expand_dim(dim...) = (dim..., 3, 1)
zeros_like(T::Type, dims...) = fill!(similar(T, dims...), 0f0)
zeros_like(xs::AbstractArray, dims...) = fill!(similar(xs, dims...), 0f0)
randn_like(T::Type, dims...) = randn!(similar(T, dims...))
randn_like(xs::AbstractArray, dims...) = randn!(similar(xs, dims...))
Flux.jl では gpu という関数が定義されていて、この関数は CUDA 環境が有効な時に限り オブジェクト (Array など) を CUDA 用のオブジェクト (CuArray など) にコンバートします。(CUDA 環境が有効でない時は何もしません)。逆に Array に変換を行う cpu という関数も存在します。
普通に zeros や randn を使って gpu で変換してもいいのですが、
Juliaだと関数は型安定である方がいいと言われているので、出力の型が環境に応じて変化する gpu を毎回使うのを防ぐために zeros_like と randn_like を定義しました。
気になって変換方法について色々試してみたのですが、やはり similar! を使うのが良いのではないかと思います。 https://gist.github.com/matsueushi/be3071f6b6be040dd7ae9e51cf74b1e5
画像サイズの計算
最下層の画像のサイズ min_size からスタートして、サイズを縦横 scale 倍することを繰り返して最終的なサイズ image_size に拡大していく関数を作ります。
100層も学習することはないと思うので下のような形になっています。
function size_pyramid(scale, min_size, image_size)
    current_size = min_size
    pyramid = Vector{Tuple{Int64,Int64}}()
    for i in 1:100
        push!(pyramid, current_size)
        current_size == image_size && break
        current_size = @. floor(Int64, min_size * scale^i)
        current_size = min.(current_size, image_size)
    end
    return pyramid
end
中間の Conv 層のチャンネル数は 32 からスタートしてピラミッドを 4 階上がるごとに 2 倍になりますが、128でキャップをかけておきます。
channel_pyramid(n_stage) = min.(map(s->32 * 2^(floor(Int64, s / 4)), 1:n_stage), 128)
画像の拡大、パディング
画像を image_shape の大きさに拡大したあと、周囲を padded_shape の大きさになるまで0で埋める関数を作ります。
Supplimental Material の “Boundary conditions and the effect of padding” を見ると Conv 層における0埋めにより画像の四隅の多様性が失われるが、Generator に入力するノイズの周辺をノイズでパディングする (つまり、ノイズ画像の方を大きくする)と軽減されるということなので、今回アニメーションをさせることを考えて0埋めをすることにしました。
そのため $$ \begin{aligned} G(x, z) = (x)\uparrow^r + \psi(z + (x)\uparrow^r) \end{aligned} $$ は少し修正が必要になります。\(z\) は \((x)\uparrow^r\) よりも 四方が幅 \(d\) だけ大きいように毎回取るようにして、 \(\langle \rangle_d\) を幅 \(d\) の0パディング, \(\rangle \langle_d\) を幅 \(d\) のトリミングとすると、実際にやることは
$$ \begin{aligned} G(x, z) &= \rangle(\bar{x} + \psi(z + \bar{x}))\langle_d, \\ \bar{x} &= \langle(x)\uparrow^r\rangle_d \end{aligned} $$ です。定義するのは \(\langle(\cdot)\uparrow^r\rangle_d\) の部分です。
function resize_and_padding(x::Array{Float32,4},
            image_shape::Tuple{Int64,Int64}, padded_shape::Tuple{Int64,Int64})
    # println(size(x), image_shape, padded_shape)
    x_large = imresize(view(x, :, :, :, 1), image_shape...)
    xx = zeros(Float32, expand_dim(padded_shape...))
    pad1, pad2 = (@. (padded_shape - image_shape) ÷ 2)[1:2]
    xx[1 + pad1:image_shape[1] + pad1, 1 + pad2:image_shape[2] + pad2, : , 1] = x_large
    return xx
end

function resize_and_padding(x::CuArray{Float32,4},
            image_shape::Tuple{Int64,Int64}, padded_shape::Tuple{Int64,Int64})
    return cu(resize_and_padding(adapt(Array{Float32}, x), image_shape, padded_shape))
end
関数を Array と CuArray で分けているのは、 画像を拡大するImages.jlの imresize を使うと GPU arrays のスカラー操作が極めて遅いと警告が出るためです。
https://github.com/JuliaGPU/GPUArrays.jl/blob/master/src/indexing.jl#L16
CuArray の場合は一旦 Array に変換して拡大とパディングを行い、 CuArray に戻していますが効果のほどは不明です。
あとあと各ステージの画像サイズに合わせて元画像を縮小した \( x_n \) が必要になります。これを一気に作れる関数を用意します。
function build_image_pyramid(img::AbstractArray, image_shapes::Vector{Tuple{Int64,Int64}}, noise_shapes::Vector{Tuple{Int64,Int64}})
    return map((is, ns)->resize_and_padding(img, is, ns), image_shapes, noise_shapes)
end
ノイズの作成
Adversarial loss と Reconstuction loss を計算する時に使うノイズ \(z^{\text{adv}}, z^{\text{rec}}\) をそれぞれ計算する関数
build_noise_pyramid と build_rec_pyramid を生成します。
学習の状況に応じてステージごとにノイズの分散は変化するので、調節が行えるようにします。
function build_zero_pyramid(xs::AbstractArray, shapes::Vector{Tuple{Int64,Int64}})
    return map(s->zeros_like(xs, expand_dim(s...)), shapes)
end

function build_noise_pyramid(xs::AbstractArray, shapes::Vector{Tuple{Int64,Int64}}, amplifiers::Vector{Float32})
    return map((s, a)->a * randn_like(xs, expand_dim(s...)), shapes, amplifiers)
end

function build_rec_pyramid(xs::AbstractArray, shapes::Vector{Tuple{Int64,Int64}}, amplifier::Float32)
    v = build_zero_pyramid(xs, shapes)
    randn!(v[1])
    v[1] *= amplifier
    return v
end
Convolutional block
Discriminator, Generator の準備として、Convolutional block \(\psi\) から作っていきます。
このような感じで Discriminator, Generator のどちらも使える build_layers を定義しておきます。
# Re-define leakyrelu function
# https://github.com/FluxML/Flux.jl/issues/963
myleakyrelu(x::Real, a = oftype(x / one(x), 0.01)) = max(a * x, x / one(x))

conv_block(in, out) = [
        Conv((3, 3), in => out; init = glorot_normal, pad = (1, 1)),
        BatchNorm(out),
        x->myleakyrelu.(x, 0.2f0)
    ]

function build_layers(n_layers, in_chs, conv_chs, out_chs, σ)
    layers = conv_block(in_chs, conv_chs)
    for _ in 1:n_layers - 2
        push!(layers, conv_block(conv_chs, conv_chs)...)
    end
    tail_layer = Conv((3, 3), conv_chs => out_chs, σ;
        init = glorot_normal, pad = (1, 1))
    push!(layers, tail_layer)
    return Chain(layers...)
end
leakyrelu は NNlib.jl で定義されているので Flux.jl で使えますが、
Float32 の数値における (Zygote.jlの) 微分が Float64 になってしまうので自分で定義します。
https://github.com/FluxML/Flux.jl/issues/963
https://github.com/FluxML/Flux.jl/issues/979
NNlib.jlに投げたこのプルリクがマージされたら定義し直す必要がなくなる予定です。(CuArrays.jl も修正する必要があるかもしれませんが……) https://github.com/FluxML/NNlib.jl/pull/149
Discriminator, Generator
いよいよ Discriminator, Generator の定義です。 簡単な Discriminator から作ります。DiscriminatorPyramid に関しては、単に Discriminator を複数個集めて来ただけです。
"""
    DiscriminatorPyramid
"""
mutable struct DiscriminatorPyramid{T <: Tuple}
    chains::T
    DiscriminatorPyramid(xs...) = new{typeof(xs)}(xs)
end

build_single_discriminator(n_layers, conv_chs) = build_layers(n_layers, 3, conv_chs, 1, identity)

function DiscriminatorPyramid(n_stage::Integer, n_layers::Integer)
    ds = build_single_discriminator.(n_layers, channel_pyramid(n_stage))
    return DiscriminatorPyramid(gpu.(ds)...)
end

function DiscriminatorPyramid(image_shapes::Vector{Tuple{Int64,Int64}}, n_layers::Integer)
    DiscriminatorPyramid(Base.length(image_shapes), n_layers)
end

function Base.show(io::IO, d::DiscriminatorPyramid)
    print(io, "DiscriminatorPyramid(")
    join(io, d.chains, ", \n")
    print(io, ")")
end
ノイズ画像を足してレイヤーに通し、出力結果にオリジナルの画像を加えて周囲をトリミングする NoiseConnection (名前は適当)を作ります。
$$
\begin{aligned}
G(x, z) &= \rangle(\bar{x} + \psi(z + \bar{x}))\langle_d, \\
\bar{x} &= \langle(x)\uparrow^r\rangle_d
\end{aligned}
$$
上の式で言えば
$$
\begin{aligned}
N(\bar{x}, z) &= \rangle(\bar{x} + \psi(z + \bar{x}))\langle_d
\end{aligned}
$$
を計算するレイヤーです。pad は周囲でノイズパディングを行うサイズ \(d\) です。
basic.jl の SkipConnection の実装を参考にしました。
https://github.com/FluxML/Flux.jl/blob/e92da0cf850a982c425b83c92d6274174e52b02c/src/layers/basic.jl#L197
"""
    NoiseConnection
"""
mutable struct NoiseConnection
    layers
    pad::Int64
end

@Flux.functor NoiseConnection

function (nc::NoiseConnection)(prev::T, noise::T) where {T <: AbstractArray{Float32,4}}
    pad = nc.pad
    raw_output = nc.layers(noise + prev)::T + prev
    return raw_output[1 + pad:end - pad, 1 + pad:end - pad, :, :]
end

function Base.show(io::IO, nc::NoiseConnection)
    print(io, "NoiseConnection(", nc.layers, ", ", nc.pad, ")")
end
いよいよ GeneratorPyramid の定義です。
"""
    GeneratorPyramid
"""
mutable struct GeneratorPyramid{T <: Tuple}
    image_shapes::Vector{Tuple{Int64,Int64}}
    noise_shapes::Vector{Tuple{Int64,Int64}}
    pad::Int64
    chains::T
    GeneratorPyramid(image_shapes, noise_shapes, pad, xs...) = new{typeof(xs)}(image_shapes, noise_shapes, pad, xs)
end

build_single_gen_layers(n_layers, conv_chs) = build_layers(n_layers, 3, conv_chs, 3, tanh)
build_single_generator(n_layers, conv_chs, pad) = NoiseConnection(build_single_gen_layers(n_layers, conv_chs), pad)

function GeneratorPyramid(image_shapes::Vector{Tuple{Int64,Int64}}, n_layers::Integer, pad::Integer = 5)
    n_stage = Base.length(image_shapes)
    # receptive field = 11, floor(11/2) = 5
    noise_shapes = [2 * pad .+ s for s in image_shapes]
    ds = build_single_generator.(n_layers, channel_pyramid(n_stage), pad)
    return GeneratorPyramid(image_shapes, noise_shapes, pad, gpu.(ds)...)
end

function Base.show(io::IO, d::GeneratorPyramid)
    print(io, "GeneratorPyramid(")
    print(io, d.image_shapes, ", ")
    print(io, d.noise_shapes, ", ")
    println(io, d.pad, ", ")
    join(io, d.chains, ", \n")
    print(io, ")")
end

function (genp::GeneratorPyramid)(xs::AbstractVector{T}, st::Integer, resize::Bool) where {T <: AbstractArray{Float32,4}}
    if st == 0
        zeros_shape = resize ? first(genp.noise_shapes) : first(genp.image_shapes)
        return zeros_like(T, expand_dim(zeros_shape...))
    end
    prev = genp(xs, st - 1, true)
    out = genp.chains[st](prev, xs[st])
    return resize ? resize_and_padding(out, genp.image_shapes[st + 1], genp.noise_shapes[st + 1]) : out
end
最後の関数が画像を生成する関数で、xs が与えるノイズ、st が到達したいステージ、resize が生成した後に拡大したいかどうかです。
ステージの添字の数え方は論文とは上下が逆で下から上の順に大きくなっているので注意です。
損失関数
次に損失関数を定義します。SinGAN のオリジナルの実装では GAN には WGAN-GP を使っているのですが、残念なが自分のスキルでは Gradientを損失条件の中に入れられなかった (損失関数の中にGradientの計算関数を入れると、損失関数の微分が取れなかった) ので、泣く泣く LSGAN に置き換えています。
function discriminator_loss(d_real::AbstractArray, d_g_fake_adv::AbstractArray)
    real_loss = mse(1f0, mean(d_real; dims = (1, 2)))
    fake_loss = mse(0f0, mean(d_g_fake_adv; dims = (1, 2)))
    return real_loss + fake_loss
end

generator_adv_loss(d_g_fake_adv::AbstractArray) = mse(1f0, mean(d_g_fake_adv; dims = (1, 2)))

generator_rec_loss(real_img::AbstractArray, g_fake_rec::AbstractArray) = mse(real_img, g_fake_rec)
いちいち0や1をベクトルに直す必要はありません。シンプルに書けていいですね。
Discriminator, Generator の更新
損失関数の値を計算し、Discriminator, Generator のパラメーターに関する微分を取ってパラメーターを更新する関数を書きます。
function update_discriminator!(opt, dscr, real_img, g_fake_adv)
    @eval Flux.istraining() = true
    ps = params(dscr)
    grad = gradient(ps) do
        discriminator_loss(dscr(real_img), dscr(g_fake_adv))
    end
    update!(opt, ps, grad)
    @eval Flux.istraining() = false
end

function update_generator!(opt, dscr, gen, real_img, prev_rec, prev_adv, noise_rec, noise_adv, alpha)
    @eval Flux.istraining() = true
    ps = params(gen)
    grad = gradient(ps) do
        g_fake_rec = gen(prev_rec, noise_rec)
        d_g_fake_adv = dscr(gen(prev_adv, noise_adv))
        generator_adv_loss(d_g_fake_adv) + alpha * generator_rec_loss(real_img, g_fake_rec)
    end
    update!(opt, ps, grad)
    @eval Flux.istraining() = false
end
ここで、
grad = gradient(ps) do
    discriminator_loss(dscr(real_img), dscr(g_fake_adv))
end
この部分はこれと一緒です。(https://docs.julialang.org/en/v1/manual/functions/index.html#man-anonymous-functions-1)
grad = gradient(() -> discriminator_loss(dscr(real_img), dscr(g_fake_adv)), ps)
gradient の代わりに pullback を使うと微分と同時に関数の値も取得できます。(https://fluxml.ai/Zygote.jl/latest/adjoints/#Pullbacks-1)
パラメーターの更新後に損失関数の値を返したい場合、例えばこのように書けばOKです。
function update_discriminator!(opt, dscr, real_img, g_fake_adv)
    @eval Flux.istraining() = true
    ps = params(dscr)
    loss, back = pullback(ps) do
        discriminator_loss(dscr(real_img), dscr(g_fake_adv))
    end
    grad = back(Zygote.sensitivity(loss))
    update!(opt, ps, grad)
    @eval Flux.istraining() = false
    return loss
end
学習
1エポックの学習は次のようになります。 改めて損失関数の値を計算しているので少し無駄になっている気もしますが気にしないでおきます。
function train_epoch!(opt_dscr, opt_gen, st, loop_dscr, loop_gen,
        dscr, genp, prev_rec, noise_rec, real_img, amplifiers, alpha)

    # discriminator
    foreach(1:loop_dscr) do _
        noise_adv = build_noise_pyramid(prev_rec, genp.noise_shapes[1:st], amplifiers)
        g_fake_adv = genp(noise_adv, st, false)
        update_discriminator!(opt_dscr, dscr, real_img, g_fake_adv)
    end

    # generator
    foreach(1:loop_gen) do _
        noise_adv = build_noise_pyramid(prev_rec, genp.noise_shapes[1:st], amplifiers)
        prev_adv = genp(noise_adv, st - 1, true)
        update_generator!(opt_gen, dscr, genp.chains[st], real_img, prev_rec, prev_adv, noise_rec, last(noise_adv), alpha)
    end

    noise_adv = build_noise_pyramid(prev_rec, genp.noise_shapes[1:st], amplifiers)
    g_fake_adv = genp(noise_adv, st, false)
    loss_dscr = discriminator_loss(dscr(real_img), dscr(g_fake_adv))
    d_g_fake_adv = dscr(g_fake_adv)
    loss_gen_adv = generator_adv_loss(d_g_fake_adv)
    g_fake_rec = genp.chains[st](prev_rec, noise_rec)
    loss_gen_rec = generator_rec_loss(real_img, g_fake_rec)

    return loss_dscr, loss_gen_adv, loss_gen_rec
end
ハイパーパラメーターを入れておく箱を用意して、
mutable struct HyperParams
    scale::Float64                  # progression scale, > 1
    min_size_x::Int64               # minimal image width
    min_size_y::Int64               # minimal image height
    img_size_x::Int64               # output image width
    img_size_y::Int64               # output image height
    n_layers::Int64                 # number of conv layers
    max_epoch::Int64                # training epochs
    reduce_lr_epoch::Int64          # reduce learining rate after training `redule_lr_epoch` epochs
    save_image_every_epoch::Int64   # save generated image every `save_image_every_epoch` epoch
    save_loss_every_epoch::Int64    # save loss every `save_loss_every_epoch` epoch
    loop_dscr::Int64                # training steps par descriminator training epoch
    loop_gen::Int64                 # training steps par generator training epoch
    lr_dscr::Float64                # discriminator learining rate
    lr_gen::Float64                 # generator learning rate
    alpha::Float32                  # rec loss coefficient
    amplifier_init::Float32         # noise amplifier
    HyperParams() = new(4/3, 25, 25, 128, 128, 5, 2000, 1600, 500, 100, 3, 3, 5e-4, 5e-4, 50f0, 1f0)
end

show_dict(hp::HyperParams) = OrderedDict(string(nm) => getfield(hp, nm) for nm in fieldnames(HyperParams))
image_shapes(hp::HyperParams) = size_pyramid(hp.scale, (hp.min_size_x, hp.min_size_y), (hp.img_size_x, hp.img_size_y))

function setup_models(hp::HyperParams)
    img_shapes = image_shapes(hp)
    dscrp = DiscriminatorPyramid(img_shapes, hp.n_layers) |> gpu
    genp = GeneratorPyramid(img_shapes, hp.n_layers) |> gpu
    return dscrp, genp
end
ようやく最終的な train 関数の完成です。(画像を出力するところなどは省いています)。
estimate_noise_amplifier は、一段階前の画像と元画像からノイズの分散を調節する関数です。
function estimate_noise_amplifier(prev_rec::AbstractArray{Float32,4}, real_img::AbstractArray{Float32,4},
        pad::Integer, amplifier_init::Float32)
    prev_rec_crop = @view prev_rec[1 + pad:end - pad, 1 + pad:end - pad, :, :]
    rmse = sqrt(mse(real_img, prev_rec_crop))
    return rmse * amplifier_init
end

function train!(dscrp::DiscriminatorPyramid, genp::GeneratorPyramid,
        real_img_p::Vector{T}, hp::HyperParams) where {T <: AbstractArray{Float32,4}}
    stages = Base.length(genp.image_shapes)

    amplifiers = Float32[]

    # fixed noise for rec
    fixed_noise_rec = build_rec_pyramid(first(real_img_p), genp.noise_shapes, 1f0)
    fixed_noise_adv = similar(fixed_noise_rec)

    for st in 1:stages
        @info "Step $(st)"
        # reset optimizer
        opt_dscr = ADAM(hp.lr_dscr, (0.5, 0.999))
        opt_gen = ADAM(hp.lr_gen, (0.5, 0.999))

        # calculate noise amplifier
        prev_rec = genp(fixed_noise_rec, st - 1, true) # padded
        amp = st == 1 ? 1f0 : estimate_noise_amplifier(prev_rec, real_img_p[st], genp.pad, hp.amplifier_init)
        push!(amplifiers, amp)
        # add noise for adv
        fixed_noise_adv[st] = amp * randn_like(prev_rec, expand_dim(genp.noise_shapes[st]...))

        save_noise_amplifiers(st, amp)
        @info "Noise amplifier = $(amp)"

        @time for ep in 1:hp.max_epoch
            # reduce learnint rate
            if ep == hp.reduce_lr_epoch
                @info "Reduce learning rate"
                opt_dscr.eta /= 10
                opt_gen.eta /= 10
            end

            loss_dscr, loss_gen_adv, loss_gen_rec =
                train_epoch!(opt_dscr, opt_gen, st, hp.loop_dscr, hp.loop_gen,
                    dscrp.chains[st], genp, prev_rec, fixed_noise_rec[st], real_img_p[st], amplifiers, hp.alpha)
        end
    end

end
アニメーション結果
一応トレーニング関数まで到達したので、具体的な実行方法などは一番最後に載せたレポジトリを見てもらうこととして、とりあえずアニメーションの結果を見せたいと思います。
公式実装のアニメーションで使われている画像を強引に 64x64 にリサイズしたものを使いました。

無理やり 256x256 に引き伸ばすとこんな感じです。
25x25 のサイズからスタートして、64x64 で終了させたのですが、GCP の n1-standard-8 + K80 で一時間弱で学習が終わりました。 今回は Julia サイドで画像だけ吐き出して、アニメーション GIF は ImageMagick で作成しました。
$ convert -delay 10 -loop 0 img*.png fluxjl-singan_lightning.gif

実際の画像はかなり小さいので、256x256 に拡大するとこんな感じです。
もっと時間をかけて大きい画像まで学習すれば高精細な結果が得られると思います。
アルバムのジャケットをアニメーションさせた結果です。


まだまだ実装の改良の余地がありそうですが、一応一枚の画像だけを使ってアニメーション画像を作成するモデルを Flux.jl で実装できました。
詳細な部分も含めた全コードはこちらです。 matsueushi/SinGAN